This isn't really an essay, it's just all that I have found out over time about how to deal with difficult thread, like sliver, metallic, and twisted threads. What can you do if you really want to sew with specialty threads in the needle? Keep in mind that if you cannot get the thread to sew properly in the needle, you can almost always use it in the bobbin, instead, and work upside down, instead. That being said, what can you do if you really want to sew with specialty threads in the needle?
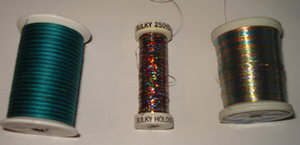
First of all, buy a good metallic or specialty thread. Good, easy-to-use metallic do exist; my current favorites are Yenmet, YLI, Superior and Madeira FS#20. The first three are fine metallics in beautiful colors that are coated with a fine resin and do not shred in your needle. The last is a black core thread with a metallic wound around it that sews just like cotton – you don’t need any special needles or goop at all. If you want a good sliver metallic (flat, tinsel-like thread), buy Superior Glitter thread.
First of all, buy a good metallic or specialty thread. Good, easy-to-use metallic do exist; my current favorites are Yenmet, YLI, Superior and Madeira FS#20. The first three are fine metallics in beautiful colors that are coated with a fine resin and do not shred in your needle. The last is a black core thread with a metallic wound around it that sews just like cotton – you don’t need any special needles or goop at all. If you want a good sliver metallic (flat, tinsel-like thread), buy Superior Glitter thread.

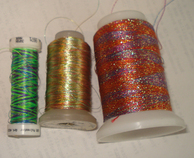
Next, pay attention to the way your thread is wound on the spool. If your thread is wound about your spool horizontally, so you see even bands of thread (Talon, Coats & Clark, most sliver and Glitter threads), the thread must come off of the SIDE of the spool (not one of the ends), whether the spool is sitting vertically or horizontally. Try it with some sliver thread – try pulling it off the side and it will stay nice and flat; try pulling it off over one of the ends and it will spin itself into a tizzy. The same happens – to a lesser or greater degree – with all horizontally, or “stacked” threads. (Think about pulling off some toilet paper. If you pull it off the side of the spool, it is nice and flat. If you try to pull it off the end of the spool, it's a tangled mess.)

If your thread is wound about the spool in a figure 8 fashion, it is meant to come off the top of the spool. Some crosswound threads (Halo, Yenmet, etc.) have big spools with larger “bottom” for the cone to sit on, and it is easy to tell the top and the bottom. If you have a Guterman or Sulky crosswound thread, though, you usually cannot tell the top and the bottom (don’t go by the printing, it tells you nothing) until you test it.
|
With the skinny crosswound spools, hold the thread spool horizontally and pull some thread off of one of the ends, and hold that thread up by the spool itself (about 1/2” away) and see if the threads twist themselves around one another. Let the thread drop. Test the other end. Whichever end twists the LEAST is the end you want the thread to come off of.
The thread in the image at the left shows the bottom of the spool because the thread is all twisted together. The thread in the image at the right shows the top of the spool, because the threads haven't twisted together at all. Mark this end with a "T" for top, and have the thread come off that end of the spool. |

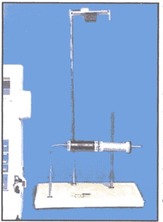
Get creative and figure out where you can position your thread so that it comes off the spool correctly before it goes to your thread guides, or get a thread stant that has both a vertical and a horizontal spindle, like this ThreadPro gadget. It sits beside your sewing machine and has horizontal and vertical spool pins on it. If you put the thread on the horizontal spindle, stacked thread off the side of the spool, goes up to a smoothing foam pad, then is sent to your machine in the normal fashion. If you put your crosswound thread on the vertical spindle, it goes directly up to the top of the holder, then is fed into your machine.
Unfortunately, I haven't been able to find a ThreadPro lately, but Superior Threads (http://www.superiorthreads.com/shop/category/?q=thread+holder) now has a pretty good one that has a vertical spindle in its base, and a hole in the side of the stand so you can put either stacked thread or crosswound thread on the spindle and have the thread come off correctly (crosswound thread through the top hole, stacked thread through the side hole).
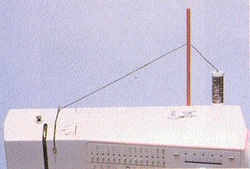
If you cannot find such a thing, you can bend a coathanger into an L shape and duct tape it to the side of your machine to give yourself the kind of spool holder you want, and use a clothespin on the end to keep the thread from spinning off.
Tension - Lower your top tension by one or two numbers, however much you can lessen it and still get a good stitch. Keep in mind that you MUST have your presser foot UP to thread your needle and DOWN to change the tension. You can twiddle the dial all you want, but it won’t take effect unless you have the presser foot DOWN.
It may be sufficient just to use the same thread in the top as you do in the bobbin, but you may need to put a fine thread in your bobbin such as a fine machine embroidery thread, or “bobbin” thread in your bobbin to keep the stitches locking evenly. When I quilt a two-sided quilt, I will often use a very fine (.oo4 mm) invisible thread in the bobbin, so that even though I lessen the top tension considerably, I never see the thread coming to the top. If you do this, be sure to wind your invisible threads more slowly than you usually do, and only fill the bobbin halfway.
Put a topstitching needle in your sewing machine, preferably a Schmetz System 130N, size 100 or 110. These needles are as big as a horse’s leg, but do you really care how big a hole you make as long as thread does not break? They are somewhat hard to find, but you can usually find them at a store that specializes in selling sewing machines. The cheapest place to get them is http://www.discountembroiderysupply.com. Truly, a topstitching needle makes all of the difference in the world. Get them directly from Schmetz, if you need to, at www.schmetz.com.
Sewer's Aide - Next, determine whether or not your sewing machine has a computer-regulated tension disc, and lubricate your thread accordingly. If your machine is old, like mine, you can use Sewer’s Aide or Sewer’s Ease, which you can get at any fabric store. All of these are thread lubricants that you squirt directly on your thread. Just squirt a bead or two or three of this lubricant down your spool, and put a little drop on your thread guide. In addition, you can stick a little square of felt or moleskin to your machine just above where the thread goes to the needle, and squirt a little bit of lubricant on that patch so the thread is lubricated as it passes over the moleskin. Some people even use a specially lubricated piece of fabric to sew through every now and then, but I cannot be bothered to keep doing that. With Sewer’s Aide, you only have to do it every 1/2 hour or so, or whenever the thread starts to break. If there is nowhere to put the moleskin, and your thread is giving you fits, just squirt a little Sewers’ Aide on the back of your needle every half hour or so.

Drinking Straw - Another problem that some threads (especially the 1000 yard stacked thread spools) have, is that they tend to hop off of the spool and twine themselves around the bottom of the spool pin get caught and the next thing you know, you break the needle. If you are lucky enough to have two vertical spool pins, put your thread on the spool pin farthest away from the needle, with the thread coming off the back of the spool. Put a plastic drinking straw over the other spool pin. Thread your thread through a large sewing machine needle, and stick it through the drinking straw, above the level of the thread spool. Take the thread out of the needle and continue threading the machine normally. With the thread going through the drinking straw above the level of the top of the spool, the thread cannot get caught around the bottom of the spool pin, anymore.
Some people buy little stretchy things and slip them over the spool from the bottom, or tie a piece of yarn around the spool in the middle, forcing the thread to come off the spool from the top. This also works, if you do not have a second spool pin.
Change a sharp thread guide - Some machines have a hooky thing as their first thread guide, and you can actually watch your thread being shredded as it goes through this guide (Berninas, especially). Tape a little safety pin to the top the machine just by this guide, and thread the thread through it instead of the thread guide. It will really help.
If you are having trouble with free motion stitching and you have a Brother electronic machine, set the stitch length on “4.” This will override the magical thing inside that breaks your stitches.
If you know if anything else that should go in this article, please let me know!

